
If you’ve ever wished for a steady supply of fresh basil but have limited space, this clever vertical growing method is the perfect solution. By repurposing a simple plastic bottle and using just a few basil cuttings, you can create a compact, lush tower of greenery right on your windowsill or balcony. This method not only recycles waste but also produces a surprising amount of basil in a very small footprint—ideal for apartment dwellers, busy cooks, or anyone wanting a low-effort herb garden.
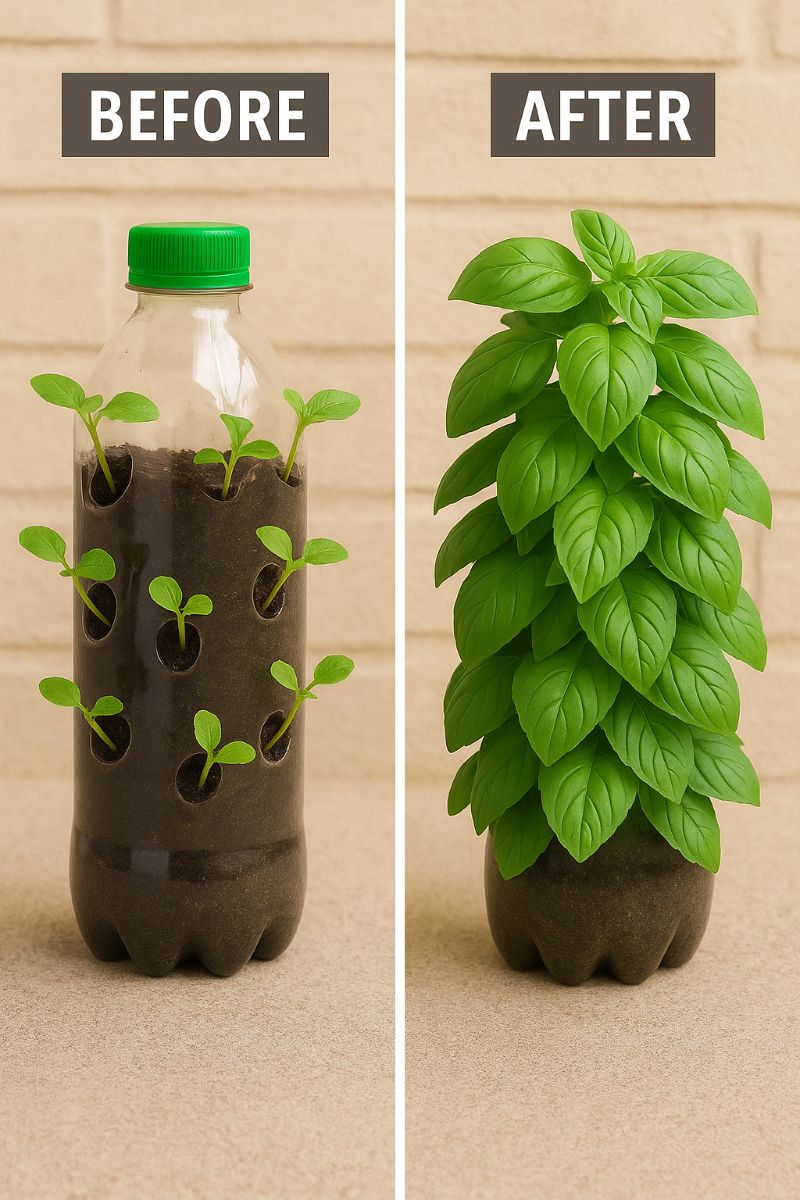
The transformation is both rewarding and visually striking—as shown in the before-and-after image, a few sprigs of basil can evolve into a dense, fragrant bush with proper care and pruning. Best of all, you don’t need to start from seeds or buy full-grown plants. With just some soil, a knife, and fresh basil cuttings, you’ll be on your way to growing a vertical herb garden that thrives with minimal upkeep. Let’s walk through exactly how to recreate this step-by-step at home.
🌿 DIY Basil Tower from Cuttings in a Plastic Bottle
1. Gather Your Materials
1 empty clear plastic bottle (1.5–2L)
Sharp scissors or utility knife
Rich potting soil
Basil cuttings (3–4 inches long, with at least 2 nodes)
Small screwdriver or knife tip
Water
2. Cut Slits in the Bottle
Using a sharp blade, poke evenly spaced horizontal slits around the sides of the bottle (3 rows, about 3 holes per row).
Make each slit about 1–1.5 inches long and angled slightly upward to support the cuttings.
3. Fill the Bottle with Soil
Remove the bottle cap and fill the bottle with lightweight potting mix (or a blend of compost, coco coir, and perlite).
Lightly tamp the soil down but don’t overpack—it needs good drainage and airflow.
4. Prepare the Basil Cuttings
Snip basil cuttings just below a leaf node.
Strip off the bottom leaves (only leave the top 2–4 leaves).
Optional: Dip the cut end in rooting hormone to speed up rooting.
5. Insert Cuttings into Slits
Gently push the bottom of each cutting into the slits, ensuring the node is embedded in soil.
For stability, insert them at a slight upward angle.
Water the soil from the top so it settles around the inserted stems.
6. Create a Mini Greenhouse
Place the bottle in bright indirect sunlight (a windowsill works).
Leave the cap off for airflow or loosely cover with plastic wrap to retain humidity during the first few days.
7. Water and Monitor Daily
Next Page
